Loading text data into Hyperion Planning has always had limits. You had to leverage the format of the outline load utility, which had no transformation functionality. Sure, you could use ODI to do amazing transformations, but were limited on automation unless you had purchased the full use license.
Data Management for PBCS and EPBCS was enhanced in late summer 2016 to facilitate text loads. This enhancement simplified the file requirements for the IT department and put some control in the hands of the system administrators.
There are excellent blogs out there that show the end to end process for loading text values using Data Management.
I have not seen a blog that shows you how to transform the text values. Although, I did not look very hard. That is what I will cover in this brief blog.
Scenario:
I have a Position cube. Attributes are assigned to each position. I am going to focus on Job Code which is a Smart List and assigned to each position.
The Job Code Smart List is mapped to a dimension in an ASO cube.
When we run our data map, the Smart List assignment in the Position cube is mapped to the corresponding member of the Job Code dimension in the ASO cube.
My goal is to add a prefix to the Job Code and shorten the name during the position detail file load.
- Why do I want to do that?
- The job code values overlap with the member names in my Program dimension, so I want to keep everything unique and clear.
Example: Change Job Code ‘101159 Assistant to the Mayor’ to ‘JC_101159’.
I will use Data Management to load the position detail flat file and transform the values in the field ‘Job_Code_Input’.
Source File:

Data Management :
The key is using the option to write your own SQL (#SQL – in this context this is not a Twitter reference).
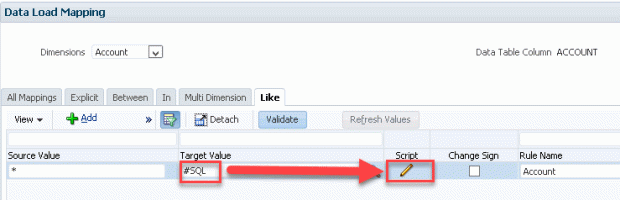
About the SQL below… DATA is the source data field in the Data Management table and DATAX is the target data field.
I am using the Account mapping as a pipeline to the data fields. I still need to have a valid map for Account.
I mapped accounts using this statement ‘CASE WHEN 1=1 THEN ACCOUNT END’ (there are other ways to do this same mapping).
Once Account is mapped, I am free to transform the data.
DATAX =
CASE
WHEN ACCOUNT = ‘Job_Code_Input’ THEN SUBSTR(CONCAT(‘JC_’,DATA),0,9)
ELSE DATA
END
The CASE Statement allows me to find the specific account to transform.
I use the Sub-string and Concatenation syntax to transform the data for the account defined in the CASE Statement.

I define all other mappings and execute my load rule…
Here are the results per the workbench:
The Target Data has been transformed.

This is a basic example. The key is knowing where to write the SQL and the field names.
I hope this was helpful as a starting point and you can build from this.
As always feedback, alternative methods are welcome.
Regards,
Scott Williams
P.S. I remove Case Statement for the ACCOUNT and use the SQL below and the result is the same.
ACCOUNT,
DATAX =
CASE
WHEN ACCOUNT = ‘Job_Code_Input’ THEN SUBSTR(CONCAT(‘JC_’,DATA),0,9)
ELSE DATA
END
