Hello,
Welcome to installment #2 in my series on loading data to Oracle Planning and Budgeting Cloud Service (PBCS).
In this installment I will cover the exporting and importing of both data and meta data to PBCS from flat files through the web interface.
Series:
Installment #1 – Smart View to load data and meta data
Installment #2 – Export Data/Meta Data and Import Data/Meta data from the web interface
Installment #3 – FDMEE data loads
Installment #4 – Automated loads
Data and Meta Data:
I will cover four topics:
- Meta Data Export
- Meta Data Import
- Data Export
- Data Import
——————-Meta Data——————-
Meta Data Export
Meta Data can be extracted from the web into a file.
Helpful hint: If I need to load Meta Data from file and I don’t know the file layout I will run an extract to get it.
Exporting Meta Data is very simple.
In this example I am using the Standard (soon to be legacy) Interface instead of the Simplified Interface.

Select the Dimension and then run it.

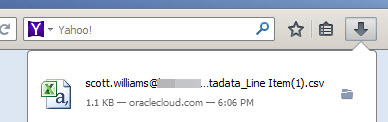
The file is saved to the default directory for downloads defined in my web browser.

File layout (and template for load)

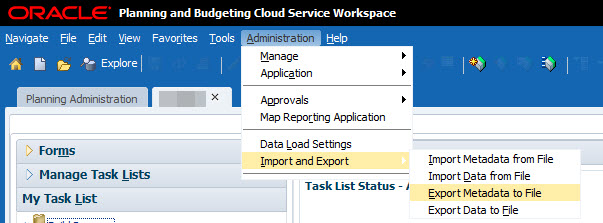
Meta Data Import
(Using the file I just exported)
Edit and save the file.

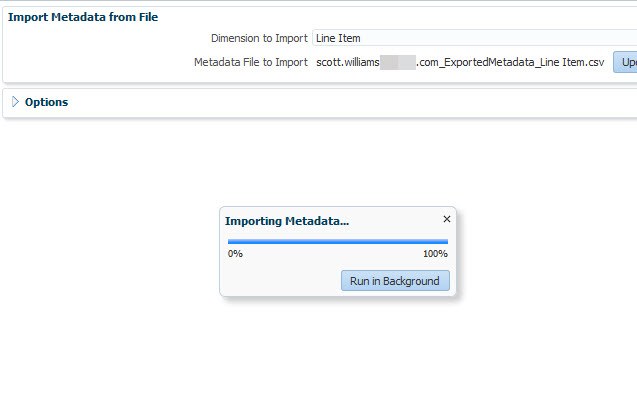
Select Import Metadata from File

- Select the Dimension to import.
- Map to the file to load.
- Then Validate to verify syntax.

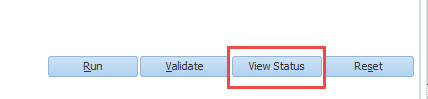
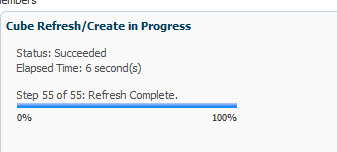
Run the load:

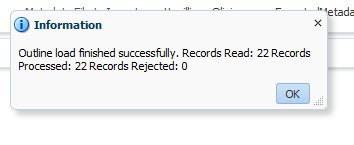
Summary of results are displayed.

Errors can be viewed by clicking on the “View Status” button.


Also with a Meta Data load, you need to remember to refresh Essbase..


——————-Data——————-
Exporting Data
Exporting data is almost as simple as exporting meta data.
Helpful hint: If I need to load data from file and I don’t know the file layout I will run an extract.
Leveraging the Simplified Interface:

The Create button allows me to create a job or one time process.

On the options screen if I select “Planning Outbox” as my Location, then I can save this process as a Job. If I intend to run this process through the scheduler or scripting then I need to save this as a Job. I will cover the use of jobs and automation in installment #4.
I selected “Local” which tells PBCS that I want to save the file to my computer.
Straight forward selection:
- Plan types
- File Type – Delimiter

Selecting the dimension members is a little more involved.

You can select members or use functions.

From the screen shot below you can tell that I selected “Level 0 Descendants” by looking n the left hand panel.

The Point of View selection:
Go through each tab for the remaining dimensions and select the member(s) &/or function(s).

The main page shows all member and function selections.

Then Export

File is downloaded to my computer.

Output:

Importing Data
Finally we load a data file through the web.
Navigate to the Console:

Under Actions select Import Data

Select Create

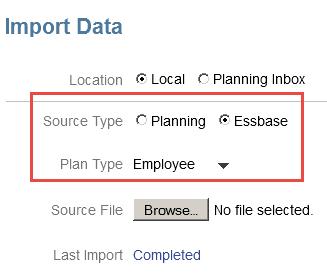
Import Data Options:
Location:
Local – Allows you to map to a file. You will use this more often when doing a manual load.
Planning Inbox – The planning inbox is a location on the cloud. You would need to load your data there prior to running a manual load. I used the inbox for automation.
Source Type: There are different file layouts. Screens shots are pasted below.
Planning layout
Note: Able to choose delimiter

Sample Layout
Note:
- 1 dimension on rows
- 1 dimension on columns
- The rest of the dimensions are assigned POV.

Essbase layout
Note: The delimiter option is gone.
Unhelpful hint: We are no longer able to export data in the Essbase layout. Which tells me that there is a chance that it may not be supported layout for load in the future.

Each column represents a dimension.

This is an “out of the box” currency application, which is why HSP_InputValue is present in the Essbase file load.
Loading the data:
After selection the Location, Source Type then select the file for load.


Run the Validate step to verify file syntax.

Select the Import button to begin the load process.

Viewing status of a load:
The status of the file load can be viewed by selecting the Jobs tab (left hand panel).

The Validate and Import Data are visible on the right hand side.

If there is an error the status will read Error. Click on the item to view the errors.
Errors are displayed in the following format.
I hope you found this installment informative and helpful.
Coming soon FDMEE on PBCS.
Regards,
Scott Williams